Dec 24, 2012

Merry Christmas!

I just finished my Christmas Tree.  I made some of my own ornaments this year and I made my very own Angel for the top of my Tree.  I used the colors of cream, gold, and silver.  Next year, I will use other colors.  I think I will try to make more tree ornaments also next year.  I want to wish everyone a happy holiday and God bless all of you.

Merry, Merry Christmas, Chan


This is the Angel I made for the top of my Tree


Here are the Christmas Hearts.  I used paper from a Christmas stack and added paper roses, wooden buttons, and swirl roses that I made.


I made this to put on my tree because I didn't have any religious ornaments.


This was a 4 ft tree with the lights already attached to it.  This made it very easy to put together. 


Here's a closeup of my handmade Christmas Hearts.


My Christmas Tree Angel.

Have a Very Merry Christmas.  God bless, Chan 


Dec 20, 2012

Christmas Wreath

Happy Holidays!!

I needed a wreath for my door but I didn't want to spend a lot of money.  Off to the dollar tree!  My Christmas theme this year is White, Silver, and Gold.  I found a nice large Santa Claus Christmas tree ornament and I brought 2 of them.  It was the perfect size for my wreath.  I also picked up two bunches of white poinsettia flowers.

I wrapped the twig wreath with some 2 inch gold ribbon I had around the house.  Then I put my Santa Claus on there with two white poinsettia flowers and then I had my Christmas Wreath.  Very inexpensive and cost effective.  Proving that you don't have to spend a fortune on Christmas decorations!

God bless, Chan


Dollar Tree Crafts!!  The wreath, Santa Claus, and White Poinsettia flowers all purchased for $1.00.  Christmas wreaths this size are selling for $15.00 - $20.00 in local dept stores.  I was able to save $$$ by making my own.
I added a strip of ribbon in the back to support Santa Claus and to keep him from falling through the wreath hole.  I also used kite string to fashion a hook to hang this on a nail.  


Santa Says "Merry Christmas!"


Nov 18, 2012

Oct 19, 2012

Bloom Where You're Planted Arts and Crafts

Hi Everyone! 

This is a little project I made this week.  It is a top from an old cigar box that I was working on in the past.  I lost the hinges to the cigar box so I decided to make something with the top and the bottom.  I made something to hang on the wall. 
 
I also made a little doll with a round body to put in the picture.  On the back, I made a pocket and put three little tags in there.  The paper I used was "The Spring Fling" Collection by DCVW.  I altered two large white buttons to make them more decorative.  In the future, I may do a video about how to dress up plain buttons . 

God bless, Chan


Oct 1, 2012

How to Make Dolls I'll Fly Away Angel Dolls

Hi Everyone!

I just made some new paper dolls.  These are Angel Dolls.  They were made the same way that I made the other dolls except these dolls have wings on them.  They are very easy to make and inexpensive.

I used pizza boxes and TV dinner boxes.  I also added handmade envelopes to the backs of them for small cards or tags.  You can also use the back of the angel to put gift cards in as well. 

God bless, Chan


Sep 16, 2012

How to Make Dolls

Hi Everyone! 

I have a little paper crafts project that I want to share with you.  Its a simple arts and crafts project that I made out of a pizza box.  It is a cardboard doll.  Its very simple to make and would be great for easy crafts.  You can make them in any size, shape, or color.

You can even change the hair color and eye colors also.  This would also be safe for kids crafts because you don't have to use hot glue for this project.  Another thing is that it is very inexpensive because you are using recycled crafts.  You can use any type of thin cardboard.  Save your pizza boxes and TV Dinner boxes.  They are great for making these handmade dolls.  This would also be great for creative crafts because you can take the doll and dress it up anyway you would like to.  This is also great for scrapbooking because you can use scrapbook paper.  Maybe make a miniature doll to include in your scrapbook or with a greeting card to a friend.

God bless, Chan


Supplies that you need to make these dolls

Thin cardboard like a pizza box or TV dinner box
Turbo Tacky Glue
Craft Bond Glue
Kite String
Large Needle
Pearl Beads
Yarn for the Hair
Scrapbook Paper for the Face, Back of Head, and Dress
Embellishments to decorate the doll (your choice)
2 Full Sheets of White Cardstock paper (for the eyes, lips, and to trace out the patterns for the doll)
Colored Pencils or Markers (to color the eyes and lips)
Hole Puncher to punch out the circle for the nose
Pair of scissors
1 clothespin (for holding the hair in place while it dries)
Scotch tape (taping the 1 pattern together for the head and body)
A circle shape to trace the head (I used a mason jar lid)


Sep 11, 2012

Crafts Make you Feel Happy

A few months ago, someone left a comment on one of my Youtube videos about how crafts can help people work through depression. The comment made me think about how arts and crafts might help people get through the hard times. It is a proven fact, that when people have hobbies, they are happier people. So I guess having something to do in your spare time can really help. Making crafts or showing others how to do crafts can help a depressed person add sunshine to his or her day.

Scrap booking is an excellent way to help with depression. Make a scrapbook of happy and cheerful things. Use bright colors like yellow, light blue, celery green, pink, and lilac. Let the colors lift your spirits. Add pictures of family members and friends who bring joy to your life. You could include pictures of an event where you had a good time. Pictures of weddings, family vacations, and holiday celebrations are wonderful to use for an uplifting scrapbook. Imagine a blue, water themed scrapbook filled with pictures of your cruise vacation that you took last year. Include some cruise ship embellishments. This would also be a great place to store brochures or ticket stubs. Then when you're feeling blue, you could look through your scrapbook and remember the good times you had in the past.

I have also found that sharing my crafts with others has added to my happiness. Start a channel on Youtube and upload videos about your crafts. A standard web cam is sufficient enough to get started. To enhance your videos, start a blog. You can get a craft blog going in no time. They are free at blogger.com and wordpress.com. Add pictures of your crafts to your blog. Upload some videos about creative crafts, kids crafts, easy crafts, summer crafts, and Sunday School crafts. Valentine's Day, Christmas, and Mother's Day are also excellent topics for craft videos. However, I would wait until right around that specific holiday to upload the video. You will get more views because everyone will be looking for ideas at that particular time.

You can also join some craft networks like Lil Scrap of Heaven and Scraps of Color. Once you set up your Youtube channel and your blog, sooner or later someone will probably invite you to join one of these networks. This is where the real fun begins because of the swaps and contests. You'll also get inside information on new products and crafting techniques. Craft networks are excellent for providing an artist exposure for his or her work.  

Later on, you may want to specialize in a particular field of interest like papercrafting, recycled crafts, crocheted crafts, or mixed media. Eventually, you will have a lot of craft friends. You will not feel anymore depressed because you will be so busy with all the swaps and contests. A busy person is a happy person. This will lift your depression and you won't have time for sadness. There is a large handmade craft community waiting to welcome you with open arms.

Yes, Crafts Can Make You Feel Happy!!!

Aug 9, 2012

A Birdhouse Picture Album

Hi.  This is a project that I made out of white poster board.  I call this a picture album birdhouse.  I used prima marketing Fairy Flora paper and Pink Paislee Butterfly Garden.

This would be a great project to use for baby showers, birthdays and holiday gifts.  I was think the other day that this would also be great for anniversary gift.  You could put pictures of the couple all through the birdhouse and you could write an anniversary message underneath one of the flaps.


Jul 12, 2012

Jul 6, 2012

Prima Flowers

Hi.  Today, I made my own prima style flowers.  Its very easy and cost effective.  All you need is lace, needle and thread, cardstock or scrapbook paper, hot glue, and your choice embellishment for the center.
 
God bless, Chan


This was the flower I used on my altered message board project


For color contrast, I used red rosettes for the center of these black flowers


Jun 23, 2012

Altered Message Board

I purchased an old message board from a yard sale. It was very damaged but it only cost a dollar. It was a bargain that I could not pass up. I've had it for a while now because I could not figure out what I wanted to do with the piece. Recently, I watched a video by FaerieCrafts on Youtube. She did an altered shadow box. This inspired me to do something with the old message board that I had purchased from the yard sale.

First I painted the frame a light pink. After that I added some antique white for distressing. However it still did not have the old vintage look that I was after. When I thought about it some more I actually decided to give it an old wall feel. When you are in an old house that has been painted several times, you can see the different layers of paint peeking thru. I decided to mix a light mint green and distress the board with this. I wanted it to look like the pink paint was wearing off and showing the green paint underneath. After that was done, then I distressed the edges of the board with Tim Holtz Vintage Photo Distress Ink. It really made the message board look very old and vintage.

To decorate the piece I used an assortment of paper roses in the colors of light pink, white, tan, burgundy, and green. I also used two handmade flowers that I made from lace. To add to the vintage feel of the piece, I used some vintage stamps and adhered them to the piece. I had a New York Liberty Stamp, 2 Paris stamps, Tim Holtz Admit One movie stamp, vintage postcard stamp, clock stamps, and an old Model T Ford Car Stamp. I also added a stained manila package tag with twine to give it a vintage country type feel. To add a little bling, I made 3 antique style buttons and I added a little pearl trim and some vintage white lace.


Jun 17, 2012

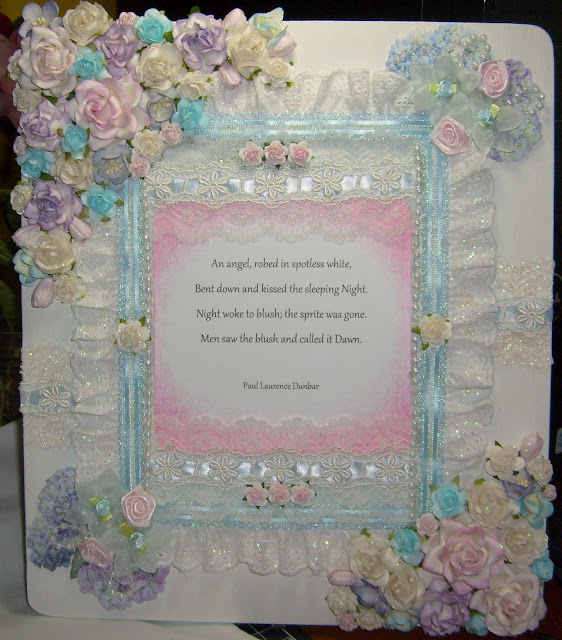
Altered Picture Frame

Hi.  I made this altered picture frame.  This project was inspired by a video produced by CraftSponge on youtube.  After watching her video, I felt inspired to make this project.

I selected my color scheme for the picture frame from a poem by Paul Laurence Dunbar (1872-1906).  His poem is one of my all time favorite poems. 


An angel, robed in spotless white,
Bent down and kissed the sleeping Night.
Night woke to blush; the sprite was gone.
Men saw the blush and called it Dawn.


Jun 9, 2012

May 30, 2012

Floral Bird Nest

Hi.  Over the weekend I brought two baskets from the Dollar Tree.  I got them because I wanted to use the little birds that I had purchased on ebay.  I thought the oval shaped baskets would make the perfect bird nest.
 
I painted and distressed the baskets then I added scrapbook paper to cover the background.  I also cut out messages for the background from the Ciao Bella Paper Stack put out by DCVW.  I also make little bird nests to sit underneath the little birds.  I used twine and dark beige yarn mixed together for this.  Then I finished out the project with lace, ribbon, and a few paper and fabric roses.  This would be a great gift and it can also be personalized with the person name on the background. 

Items that I used:

Ciao Bella Paper Stack by DCWV
IamRoses
Prima Flowers
Fabric Rosettes
Pink, blue, and beige Lace from my stash
Dollar Tree Baskets
White spray paint
Blue Spray paint
Antique White Paint for distressing Apple Barrel by Plaid


May 24, 2012

Envelope Mini Scrapbook Album Fancy

Hi.  Here's another scrapbook that I did this last week.  I was inspired by a video made by ArtSongandSoul on YouTube.  In her video "BB Country Album - Mini Album" she used cardboard and envelopes for her scrapbook.
 
What I liked the most about her video was the fact she exposed part of the corrugated part of the cardboard on the front of her cover.  I thought that was a very creative thing to do.  I did the same thing for my scrapbook.  This is a very inexpensive way to make a mini album.  In fact, I didn't have to spend anything to make it because I already had everything around the house. 

Items that I used in my scrapbook:

Cardboard box
Pink Cardstock paper
White Cardstock Paper
JoAnn Craft Essentials Glitter Glue Pink
White Paint Liquitex Titanium White
Pink Paint Folk Art Baby Pink 633
Pink Nylon Butterflies
Martha Stewart Matriarch Butterfly Punch
Scrap Lace and Ribbon I had around the house
Prima Marketing Fancy Flora Paper Stack
IamRoses
Tim Holtz Distress Ink
Rubber Stamps


May 12, 2012

May 7, 2012

Wedding Craft Ideas

Recently, someone asked me to do a video about Wedding Crafts.  Here are a few things that I made. I used the color pink, but you can make the same items in any color that you like.
You can have a lovely wedding without breaking the bank.

Here is a list of the items I used to create the wedding crafts that I made.

Paper Roses by IamRoses
Martha Stewart Butterfly Punch
Tim Holtz Distress Ink Tattered Rose
Lace from Joanns
Pink and Cream Ribbon from Ebay
Scrapbook Paper by DCWV "The Spring Fling"
White Glitter Glue by Darice